Versions Compared

Key

  • This line was added.
  • This line was removed.
  • Formatting was changed.

...

Deck of Cards
idNX Client
Card
idInstallWin
labelInstall (Windows)
Installing NX Client

Note: Write access is necessary to be able to continue with the installation, update or removal of the client software.
Double-click on the icon of the NX Client executable file you have downloaded from the NoMachine Web site: the NX Setup Wizard will take you through the installation.

Step 1

Select where to install NX Client and confirm by clicking on the Next button.
 

Step 2

The Setup Wizard will allow you to create the program shortcut in the Start Menu by default or in any folder of your choice.

To proceed, click on the Next button as usual.
 

Step 3

A further dialog will enable you to create an additional shortcut to the application on your desktop.

Confirm according to your personal preference.


Step 4

The final dialog will ask you to confirm the installation of NX Client on your machine.

Card
idInstallMac
labelInstall (Mac)

Installing the NX Client on Mac OS X

  1. Using Finder, navigate to the folder where you downloaded the NX client from NoMachine's site.
  2. Double-click the nxclient-*.*.pkg file. That should open up the installer.
  3. At the welcome screen, click Continue:


  4. Select the volume where you want NX Client to be installed, and click Continue:


  5. Click Upgrade:


  6. Enter your password, and click OK:


  7. To complete the installation, click Close:


  8. After a successful installation, you should see NX utilities in the "Applications" folder of Finder, as shown here:
Card
idConnect
labelConnect
The NX Connection Wizard GUI
The NX Connection Wizard is a GUI to guide you through the basic steps to set-up a session. It allows you to create and configure your first session file by using the default settings, which should be enough in most cases.

Enhanced session configuration is possible via the NX Client GUI. You can run either the Connection Wizard and the NX Client GUI at any time, by accessing them via the NX Client entries in the Programs Menu.

The NX Connection Wizard allows you to create your session file.

Configure Your Session Via the NX Connection Wizard
The first step is to give a name to the session and specify, in the Host field, either the hostname or IP address of the machine where your NX Server is running, and the port where the SSH daemon is listening on the server host, by default 22.

This wizard also allows you to specify the link type for your connection. More information which will help you to choose the best link type to fit your needs will be available in section 3.1 related to the NX Client GUI, General tab.0

Name your session and specify hostname or IP of the machine where your NX Server is running.

Choose Which Type of Session You Would Like to Run

In the Desktop wizard you may choose which kind of session you would like to run. Let's say that you want to start a Gnome desktop with size 1024x768.

Choose to run a GNOME desktop on your NX server.
 
Create a Session Shortcut and Run the NX Client GUI 
The final stage of the NX Connection Wizard allows you to create a session shorcut on the desktop, associated to the session file you are creating.

By selecting the Show the Advanced Configuration dialog checkbox during this stage the NX Client GUI will run once you exit from the NX Connection Wizard, allowing you to further configure the NX Client.

Create a desktop shortcut and/or run the NX Client Advanced Configuration GUI.

Card
idSettings
labelSettings
The NX Client GUI
The NX Client GUI, coming with a default configuration suitable for most cases, allows you to configure specific settings that may better fit your environment.

The paragraphs to follow will explain one by one all the GUI tab and related settings.


The General Tab

The General tab.

Server – Host
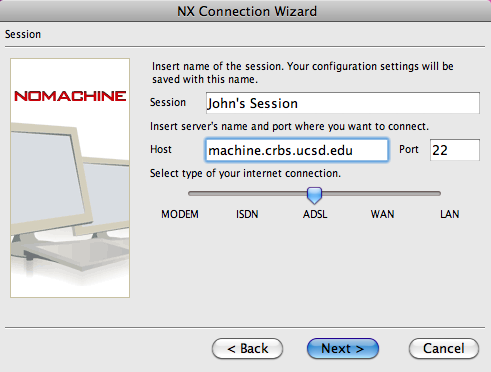
Specify the hostname or IP address of the machine where NX Server has to be contacted for starting the session.

Server - Port
Specify the port where the SSH daemon is listening on the NX Server host machine. By default the port is 22.

Server - Remember my password
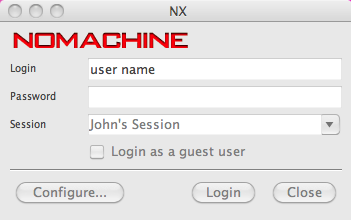
Store your password in the session file. Next time you need to run that session, NX Client will not ask you to insert the username and password in the login dialog. This allows you to automate login by simply clicking on the session configuration icon saved on your local desktop. NX Client stores the password in a scrambled format. More information about the password scrambling algorithm in NX Client is available at:

http://www.nomachine.com/ar/view.php?ar_id=AR01C00125

Server - Key
Use customized SSH keys to access NX Server. More information about replacing the default SSH keys used by NX with keys generated for your server is available at:

http://www.nomachine.com/ar/view.php?ar_id=AR01C00126

Desktop
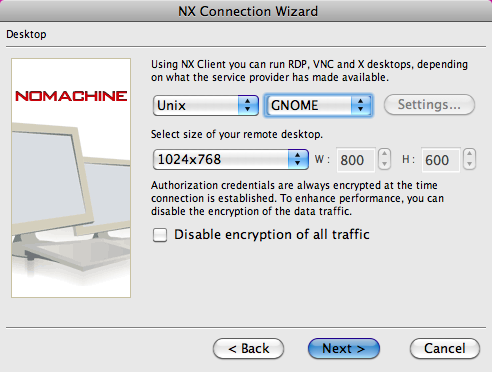
Select the session type to be run on the server. You may choose among:

Unix – run either a X11 desktop as KDE, GNOME, CDE and XDM or a single application by choosing the Custom option.

Windows – run a RDP session on a Windows Terminal Server.

VNC – run a VNC session on a VNC server.

Shadow – attach to an already running X11 session or to the native display (session shadowing and desktop sharing).

Some session types may require additional settings. For example the 'Windows settings' panel is for specifying hostname for the RDP server, while the 'VNC settings' panel is for specifying hostname and port for the VNC server. You may refer to the following article to get more information on support for RDP and VNC sessions with NX 3.0.0 or higher:

http://www.nomachine.com/ar/view.php?ar_id=AR06E00469

Sample settings for an RDP session on NoMachine Testdrive.

In the "Custom Settings" panel you may instead specify the remote application to be run in seamless mode. When the "Floating window" option is selected, nxagent operates in rootless mode, i.e. it impersonates the application's display and can rewrite the X traffic down to the real X server to hide the details of the network and be extremely bandwidth efficient. When the "Disable X agent encoding" option is selected, the NX proxy tunnels the raw X protocol traffic. NX can't do much in this case, other than compress the X traffic better than any known generic compressor. The application, in fact, is connected to the real display and so it will still suffer from all the limitations of the X system. Running the single application as "New virtual desktop" still reaps the benefits of the nxagent capabilities, but, in this case the agent is not running in rootless mode, i.e. the the application window may not match the local desktop size and may be displayed inside a black parent window.

Sample settings for running the console in rootless mode on NoMachine Testdrive

Desktop - Link type

Set the type of network connection that is going to be used to connect to the remote proxy. Some session parameters, such as the compression level, depend on this setting. For example, the link MODEM uses high compression levels for both protocol and images, while the link LAN disables the protocol compression and uses a low compression level for the image encoding, to make the best use of the available bandwidth.

The image encoding can be customized regardless of the link type. The different encoding types are explained in the Display - Use custom settings - Unix display settings section in this document.

Lazy encoding policies, i.e. the ability to defer image updates, are activated by default for all link types other than for LAN. However, you have the possibility to disable deferred screen updates in the NX Client GUI -> Advanced tab.

Display
Set the size for the X server window. In the case of 'Shadow' desktop type, when a different size other than 'As on the server' is selected, the X11 agent applies its own screen scaling capabilities.

Display - Use custom settings - Unix display settings

The General tab and the Unix - Display settings dialog for X11 sessions.

Unix - Display settings – Images

You can force the selected image encoding to be used, overriding the default encoding set according to the link type.

  • Use both JPEG and RGB compression
    The adaptive compression dynamically selects a lossy or a lossless encoding depending on how compressible the image data is.

  • Only use JPEG compression
    Use only the lossy encoding. This kind of compression is advisable on slow links, because a low image quality is covered by a minor amount of image data to transfer.

  • Only use RGB compression
    Use only the lossless encoding. This compression is advisable on fast links, since the high image quality increases the data to be sent.

  • Use plain X bitmaps
    The compression is disabled and images are sent in raw format. This setting is advised only on fast and wide links, because of the large amount of image data to transfer.

  • Quality - Use custom JPEG quality
    Specify the JPEG compression level. A lower level value means poorer image quality but higher data compression.

Unix - Display settings – Performance

  • Disable the render extension
    Disable the use of render protocol extension between the X server and the X11 agent. This can become necessary when you need to migrate your session to a display of a X server missing the render extension.

  • Disable the backing-store
    Disabling the use of backing-store may degrade NX performances, but can be useful in case you need to lower memory usage on either server and client side.

  • Disable the composite extension
    Disable use of X server's composite extension in X11 agent.

  • Disable the shared memory extension and Disable emulation of shared pixmap
    Disabling shared pixmap emulation between X11 agent and X server may increase NX performance, since the pixmap created on the X server can't be shared, but has to be kept updated. Note that, since a number of applications using shared pixmap don't check if shared pixmap is available, these applications won't work if shared memory is enabled and shared pixmap is disabled.

Display - Use custom settings - Windows display settings

  • Colors
    Define the number of colors to be set for the RDP session. This setting applies to the RDP client run for establishing the RDP session with the Windows Terminal Server.

  • Images
    Force the selected image encoding to be used, overriding the default encoding set according to the link type. This setting applies to the X11 session inside which the RDP session is running. For more details, refer to Unix display settings.

  • Cache
    Enable the RDP image cache. This setting applies to the RDP client run for establishing the RDP session with the Windows Terminal Server.

Display - Use custom settings - VNC display settings

  • Images
    Force the selected image encoding to be used, overriding the default encoding set according to the link type. This setting applies to the X11 session inside which the VNC session is running. For more details, refer to Unix display settings.

The Advanced Tab
The Advanced tab and the HTTP Proxy – Settings dialog

Network

  • Disable encryption of all traffic
    By default, the communication between NX Client and NX Server happens via an encrypted channel, allowing for establishing communication even when the server is behind a firewall.

  • Disable ZLIB stream compression
    Disable the ZLIB compression on the stream produced by the previous stages of the NX compression. Disabling the ZLIB stream compression can be useful to lower the CPU usage on the server, or to avoid overheads due to VPN software compressing the network traffic.

  • Connect through a HTTP proxy
    Allow to establish the connection via HTTP proxy, exploiting the proxy support provided by nxssh. The HTTP Proxy - Settings dialog is for specifying host and port for the HTTP proxy. User/password authentication method on the HTTP proxy is supported.

    You may refer to the following article about "How to set-up a basic environment to connect NX through a HTTP proxy":

    http://www.nomachine.com/ar/view.php?ar_id=AR04E00457

System

  • Grab the keyboard when the client has focus
    This setting is available only with NX Client for Windows. Disable the capturing of Alt-Tab and PrintScreen keys, allowing in this way to use the Alt-Tab key combination to switch you to a different remote window rather than minimizing your NX session window.

  • Disable DirectDraw for screen rendering
    This setting is available only with NX Client for Windows. Disable the use of DirectDraw engine by NXWin and use GDI engine instead. This option can be useful for solving possible conflicts due, for example, to concurrent attempts to use the DirectDraw engine by NXWin and another Windows application, and may result in better performance on Windows Vista.

  • Disable deferred screen updates
    Specify a different lazy encoding level to the default one. When the link type is WAN, the default lazy level is 1. Disabling deferred screen updates means deactivating the lazy encoding feature. When the link type is instead MODEM, ISDN or ADSL, the default lazy level is 2. So, disabling deferred screen updates means switching to lazy level 1. If the link type is LAN, the lazy encoding is not used, so disabling deferred screen updates has no effect.

  • Cache in memory
    Set size of the in-memory X message cache, by default 16 M.

  • Cache on disk
    Set size of the persistent image cache on disk, by default 64M. Setting the value to 0 will disable the persistent image cache.

  • Remove all cache files
    Delete all the cache-* files stored in the User NX directory, by default the user's home/.nx directory.
     

The Services Tab

The Services tab and the Add a new resource dialog to mount a local shared folder within the NX session.

Devices

  • Enable printer and file sharing
    Enable the forwarding of the SMB connections from NX Server to the client. The CIFS/SMB protocol is used by the server to let applications get access to printers and file shares made available on the client.

    More information on how printer and file sharing works on NX is available at:

    http://www.nomachine.com/ar/view.php?ar_id=AR08D00413


  • Enable CUPS printing
    This setting is available for NX Client for Linux. Enable the forwarding of CUPS/IPP (Internet Printing Protocol) connections from the server to the client.

  • System CUPS daemon
    This setting is available for NX Client for Linux , Mac OS X and Solaris. Path of the CUPS/IPP daemon that should be started by the client to enable printing support.

Multimedia

  • Enable multimedia support
    Enable the forwarding of audio streams inside the X11 session to an audio server running on the client. The media player running within the NX session has to provide the Esound support.

    More information on how to play sound inside the NX session is available here:

    http://www.nomachine.com/ar/view.php?ar_id=AR03D00355
     

The Environment Tab
FThe Environment tab.

User NX directory
Specify the path where the .nx directory is to be created. The user's .nx directory contains session configuration files, session directories, persistent cache and all the information necessary for handling NX sessions.

Remove old session files
Allow NX Client to clean the user's .nx directory by removing session directories and their contents when these sessions are terminated.

System NX directory
Specify the directory from where the nxclient executable is run.

Font server
This setting is available only for NX Client for Windows. Allow to specify the font server to be used on the NX client side. This can be useful to ensure that fonts are available (and compatible) on both the NX client and the NX server side. It can be required to allow every NX application to be able to use a specific font.

Select NX fonts
Allow customize fonts to be used in the NX Client GUIs.

Card
idCRBS
labelCRBS Example

Load NX Connection Wizard

The first thing you'll want to do is start up the NX Client Connection Wizard. It should be in your applications if you're on a mac or in the start menu, in the NX Client folder if you're using Windows. It should start up looking like this:

Click next.
 

Select a Profile Name and Machine to Connect to

Your profile name is in the box titled "Session". NX Client we'll save your info under this profile name. For this example we'll use "John's Session".

The host will be machine.crbs.ucsd.edu, where "machine" is the name of any of the CRBS workstations such as "war" and "famine". For this example we will use connect to phoenix, so the host will be "phoenix.crbs.ucsd.edu". Click "Next".


Select Desktop and Desktop Size

The next thing you'll need to do is set your desktop and it's size:

Next to the box that says "Unix", there will be a box that says "KDE". Click that and change it to "GNOME". Below that it says "select size of your desktop resolution". Unless your computer is greater than 8 years old, or you know you are running a low resolution, select "1024x768" to get a large desktop window for your connection. If you know you are running a low resolution, or would simply like a smaller desktop window, select a smaller resolution as appropriate. Click "Next".
 

Complete the Wizard

This is the next screen you'll see telling you that you've successfully created your profile:

Do not check in the "Show the Advanced Configuration dialog" box unless you know you will need to change specific settings. See the "settings" tab on this wiki for more details. Click "Finish".
 

Enter Your Username and Password

The next screen you'll see is this:

Enter your username next to "Login" and your password next to "Password". User your standard CRBS username and password. Click "Login". You should see a dialog box showing yourself being connected, it will look something like this:


You Are Connected!

You should see yourself connected with a window that looks like this:

Click "System" in the top left and then "Log Out username" at any time to disconnect. Enjoy!


...